Installation instructions:
Installing OpenMS in KNIME
Installation of OpenMS in KNIME is very easy and platform-independent across Windows, MacOSX and Linux. Download the latest KNIME release from the KNIME website. If you choose the full install of KNIME you most likely can skip the following installation routine since all required plugins should be installed by default. If you chose the standard (core) installation, follow the instructions here or in the extended User Tutorial :
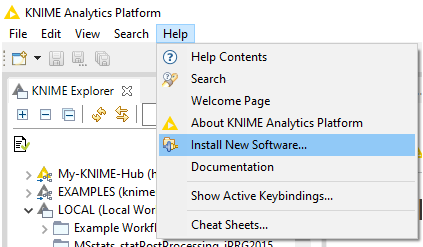
- In KNIME click on Help
- Install new Software.
Example workflow in KNIME
- Install the required KNIME File Handling nodes from the official KNIME Update Site (a standard entry in the update sites). Choose the update site from the “Work with:” dropdown menu.
Name: KNIME Analytics Platform ${YOUR_KNIME_VERSION} Update Site Location: http://update.knime.org/analytics-platform/${YOUR_KNIME_VERSION}
Filter the results for “File handling” and select the KNIME File Handling Nodes. Click Next and install.
Next, we will install the actual OpenMS plugin. Next to the “Work with:” dropdown menu, click on “Add…”.
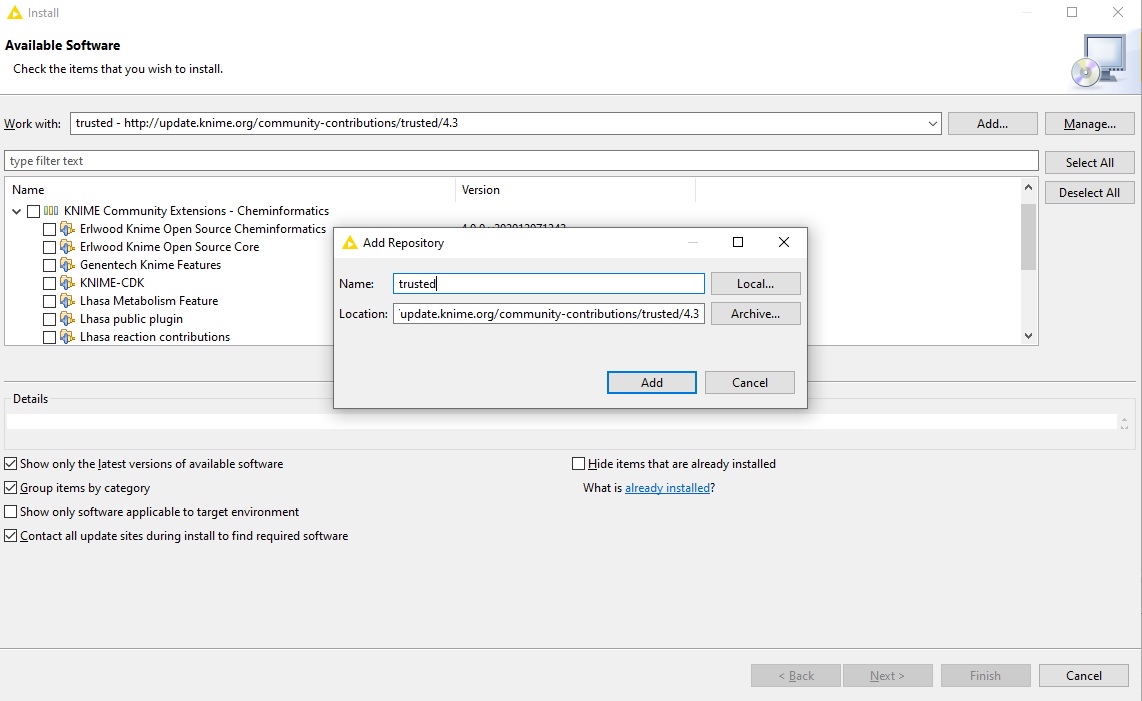
In the opening dialog fill in at least one of the following additional Update Sites (if not already present):
Installation of pyOpenMS
pyOpenMS is a python library for Liquid Chromatography-Mass Spectrometry (LC-MS) data analysis. It can be seen as an extension of OpenMS that offers almost all the features in python.
CONDA
If you use conda, you can install pyOpenMS from the defaults or conda-forge
channels:
# Best practice, use an environment rather than install in the base env
conda create -n my-env
conda activate my-env
# If you want to install from conda-forge
conda config --env --add channels conda-forge
# The actual install command
conda install -c bioconda -c conda-forge pyopenms
PIP
If you use pip, you can install pyOpenMS with:
pip install pyopenms
Also when using pip, it’s good practice to use a virtual environment - see Reproducible Installs below for why, and this guide for details on using virtual environments.
Python and OpenMS installation guide
Installing and managing packages in Python is complicated, there are a number of alternative solutions for most tasks. This guide tries to give the reader a sense of the best (or most popular) solutions, and give clear recommendations. It focuses on users of Python, openms, and the PyData (or numerical computing) stack on common operating systems and hardware.
Pip & conda
The two main tools that install Python packages are pip and conda. Their
functionality partially overlaps (e.g. both can install openms), however, they
can also work together. We’ll discuss the major differences between pip and
conda here - this is important to understand if you want to manage packages
effectively.
The first difference is that conda is cross-language and it can install Python, while pip is installed for a particular Python on your system and installs other packages to that same Python install only. This also means conda can install non-Python libraries and tools you may need (e.g. compilers, CUDA, HDF5), while pip can’t.
The second difference is that pip installs from the Python Packaging Index (PyPI), while conda installs from its own channels (typically “defaults” or “conda-forge”). PyPI is the largest collection of packages by far, however, all popular packages are available for conda as well.
The third difference is that conda is an integrated solution for managing packages, dependencies and environments, while with pip you may need another tool (there are many!) for dealing with environments or complex dependencies.
Reproducible installs
As libraries get updated, results from running your code can change, or your code can break completely. It’s important to be able to reconstruct the set of packages and versions you’re using. Best practice is to:
- use a different environment per project you’re working on,
- record package names and versions using your package installer; each has its own metadata format for this:
Installation of OpenMS binaries
Here you can select the operating system of your choce and follow the installation instructions.
Installation on GNU/Linux
➤ Install Debian package
If you are using a Debian-based Linux we suggest to use the deb-package provided by us in our archive. It is most easily installed with “gdebi” which automatically resolves the dependencies if they are available in your repositories.
sudo apt-get install gdebi
sudo gdebi /PATH/TO/OpenMS.deb
To ensure the tool functionality please add the OPENMS_DATA_PATH variable to your environment as follows (you will get an error advising you this when executing a tool):
export OPENMS_DATA_PATH=/usr/share/OpenMS
Once the path is exported, close the current terminal and open a new one.
➤ Install via package managers
Currently there are also packaged versions of OpenMS provided for Fedora, OpenSUSE, Debian, and Ubuntu available in the corresponding package managers of these distributions (they might require a lookup in thirdparty “science” repositories). For other GNU/Linux distributions or to obtain the most recent version of the library you need to build your own OpenMS.
Installation on MacOS
Simply download and install the MacOS drag-and-drop installer for your system from our archive. After double-clicking, accepting the “downloaded App warning” and mounting the dmg image, drag the OpenMS folder into your Applications folder as advised.
To use TOPP as regular apps in your shell just add the following lines to your ~/.profile file. Please adapt the first line to point to the folder where you installed OpenMS (e.g., /Applications/OpenMS-2.3.0)
export OPENMS_TOPP_PATH=<OpenMS-PATH>
source ${OPENMS_TOPP_PATH}/.TOPP_bash_profile
Known Issues: 🥲
Since macOS Catalina (maybe also Mojave) notarized apps and executables are mandatory. Although we put a lot of effort in signing and notarizing everything, it seems like our software still lands in quarantine on the abovementioned systems, after installation of the DMG (when downloading it from a browser). Therefore, to have a streamlined experience without blocking popups, we recommend to remove the quarantine flag manually. For this, open the Terminal.app and type the following (replace the first line with the actual installation directory):
cd /Applications/OpenMS-2.5-0
sudo xattr -r -d com.apple.quarantine *
There is also a known bug with running Java based thirdparty tools (like MSGFPlusAdapter and LuciphorAdapter) from within TOPPAS.app. Please run the TOPPAS.app from within the Terminal.app (e.g. with the open command) to get access to the path where Java is located (which is usually present in the PATH of your Terminal). Advanced users can set this path in the Info.plist of/inside the TOPPAS.app.
Installation on Windows
In order to install the binary package of OpenMS & TOPP, simply download and execute the installer from OpenMS.de and follow its instructions. Run the installer under the user account that later runs OpenMS - do not install using your admin account! You will be asked for an admin authentification, but only after you start the installer as normal user. The windows binary version works with most versions of windows from Win7 to Win10 (older versions might still work but are untested).
Known Issues: 🥲
Problem During installation, an error message pops up, saying “The installation of the Microsoft .NET 3.5 SP1’ package failed! You must download and install it manually in order for Proteowizard to work.”
- Solution This should only happen if you selected to install the “Third Party - Proteowizard” components. The reason is usually that .NET 3.5 SP1 is already installed (see Windows Control Panel). If it’s not installed, follow the instructions of the error message.
Problem During installation, an error message pops up, saying “The installation of the Visual Studio redistributable package … failed. …”.
Solution First of all, we’d like to stress that is a problem of a Microsoft package - we cannot do anything about it. The error message will give you the location where the redistributable package was extracted to. Go to this folder and run the executable (usually named ‘vcredistXXXX.exe’) as an administrator (right-click -> Run-As). You will likely receive an error message (this is also the reason why the OpenMS setup complained about it). Now you have to find a solution yourself. If you’re lucky the error message is instructive and the problem is easy to fix. For some messages we have a recipe:
- Error: “Error opening installation log file”
Fix: the system environment variables might be messed up. There should be a ‘TMP’ and a ‘TEMP’ variable, and both should contain ONE(!) directory only, which exists and is writable. Fix accordingly (search the internet on how to change environment variables on Windows).
- Error: “Error opening installation log file”
Installation of OpenMS in Galaxy or NextFlow
OpenMS on Galaxy 🌌
Galaxy is an open-source web platform designed for processing and analyzing large quantities of biomedical data.
TOPP tools have been integrated into Galaxy to facilitate the creation and execution of workflows.
To use TOPP tools on Galaxy:
- Go to the website.
- Create an account.
- Go to Tools on the far left and scroll down.
- Search for “OpenMS”.
- You will see a list of TOPP tools.
Example workflow in Galaxy
Choose one of the TOPP tools from the list. You will be able to run it in isolation or use it to create a workflow.
OpenMS In Nextflow
SCALABLE NF-CORE COMPATIBLE NEXTFLOW PIPELINES
Click on “Launch” to configure the pipeline for your data online and launch it via nextflow’s tower app (by registering a compute environment there) or by copying a configuration token for your local computer or HPC head node.